Thursday, October 27, 2011

Israeli Couscous, Sweet Potato & Apple Salad


On the last weekend in September, when the leaves in Atlanta were beginning to turn, Garden Chef Christina Curry brought our visitors a much anticipated taste of fall with this salad that calls for maple syrup, dried cranberries, and sweet potatoes.

Sweet potatoes grow very well in Georgia. They are extremely sensitive to frost and need warm, moist weather. They have a long growing season (about 150 days). In the Edible Garden, Sweet Potato ‘Porto Rico’ plants grew beside tomatoes all summer long. Plant them four weeks after the average date of last frost or when the soil is thoroughly warm. Sweet potatoes are planted from rooted sprouts, or slips, taken from a mature root.

There are a few ways to break down the fibers in raw vegetables to make them more palatable: 1. cooking; 2. using chemicals (such as lime juice); 3. grating. You don’t have to cook the potatoes for this recipe; you simply have to grate them.

Israeli Couscous, or pearled couscous, is more like pasta than rice. Rather than covering it with boiling water and leaving it to sit (covered), one should cook it like pasta, on the stove, for about seven minutes.

The flat-leaf parsley in the recipe, delicious this time of year, adds a taste of freshness, while the zest helps to bring the different flavors together. The result is a pleasantly moist, sweet salad that works well as a side dish or, if you have a sweet tooth, a scrumptious mid-afternoon snack.


Israeli Couscous, Sweet Potato & Apple Salad

2 cups cooked Israeli couscous
1 cup sweet potato, grated
1/2 cup apple, grated
1/4 cup golden raisins
1/4 cup dried cranberries
2 T thyme leaves
2 T Italian parsley, chopped
1/4 cup olive oil
1/4 cup cider vinegar
2 T maple syrup
1 T orange zest
1 T lemon zest
salt & pepper, to taste

In a bowl, gently combine couscous, sweet potato, apple, raisins, dried cranberries, thyme and parsley. Add the olive oil, cider vinegar, maple syrup, orange zest, lemon zest, salt and pepper. Mix well and allow the salad to marinate for 15 minutes before serving.

Don’t have any dried cranberries in your pantry, but have dried apricots instead? Want to use different herbs? Experiment with whatever you have on hand. All of Garden Chef Christina’s recipes should be considered “open to interpretation.” The one thing she does recommend sticking with is pure maple syrup - the really good stuff!

Discover more Garden Chef recipes here.

Thursday, October 20, 2011

Apple & Napa Cabbage Slaw with Sage

Word of the day: espaliered. A tree that is trained to grow against a wall, or on a flat plane, is called an espaliered tree. We’ve demonstrated this in the Edible Garden. Why do we do this? Because we’re in a city, space is limited, and espaliered trees are an attractive garden element.

The Liberty Apple is resistant to cedar-apple rust, apple scab, powdery mildew, and fire blight, all of which make apple growing difficult. The red-over-green apples ripen in early September. They were a little tart for Garden Chef Christina Curry’s recipe. A sweet apple, like the Fuji apple, would work well in this recipe. If the apples in your kitchen are tart, do what Chef Christina did on the day of the cooking demo: add some agave nectar to the recipe to sweeten it up.

This recipe is a marinated version of coleslaw. In other words, it does not use mayonnaise. Chef Christina recommends replacing mayonnaise with a combination of olive oil, vinegar, and honey. Fresh sage from the Edible Garden will also boost the flavor.

In this demo, Chef Christina used a Japanese Mandolin to julienne the apples. The Napa or Chinese cabbage in the recipe can usually be found in the store next to the bok choy.


Apple & Napa Cabbage Slaw with Sage

2 apples
juice of one lemon
1 small head Napa cabbage
1/2 small red onion
2 T sage, chopped
1/3 cup extra virgin olive oil
3 T infused white balsamic*
honey or agave nectar, to taste, optional
kosher salt & cracked black pepper, to taste

Use a mandolin, or hand chop, to julienne the apples. Squeeze the lemon juice over the apples to prevent browning. Julienne the Napa cabbage and red onion. In a large bowl, combine apples, cabbage, red onion and sage. Drizzle with the olive oil and vinegar and toss gently. If apples are tart, add a little honey or agave nectar to taste. Season with salt and pepper to taste. Serve as a side or to compliment to your favorite fish or pork dish.

* Choose any flavor of white balsamic that you enjoy

Explore more Garden Chef recipes here.

Friday, October 14, 2011

Grilled Pepper Hummus

Peppers can be fun to grow because there are so many different kinds and flavors to choose from. This year we grew ‘Early Sunsation’ Bell Pepper in the Edible Garden. Peppers like warm soil and full sun. The plants will stop producing fruit if left unpicked. So harvest away!

Garden Chef Christina Curry gave visitors some great tips on how to use peppers in hummus. You can roast them in the oven, throw them on the grill, or even turn them over the flame on a gas stove. The green ones tend to cook faster, so you want to remove them from the heat sooner than the rest. After they are cooked, throw the peppers in a paper bag to steam them. Do not rinse. You can use a paper towel to quickly wipe off the charred parts, if you so desire.

Before putting your chick peas in the food processor, be sure to rinse them. You don’t want the residual brine from the can to ruin the flavor.

Ideally, you want to use tahini paste (not tahini sauce) for this recipe. The paste is less watery. Tahini can have a bitter taste, but Middle Eastern or Greek tahini is less bitter than the kinds that come from East Asia. Tahini paste can be found at most natural food stores. It comes from sesame seeds, so it will be located near the peanut butter and other nut butters. Sesame oil can be used as a substitute in a pinch.

Grilled Pepper Hummus

2 bell peppers
2 T + 1/4 cup olive oil
2 cups chickpeas
1 clove garlic
3 T lemon juice
2 T tahini
flat leaf parsley, to taste
kosher salt & black pepper, to taste

To grill the peppers, remove the seeds and cut into pieces. Coat lightly with 2 tablespoons of olive oil, season with salt and pepper, and grill over high heat until tender. Allow the peppers to cool and gently remove the skin. Place the peppers along with remaining ingredients in a food processor and blend until smooth. Serve with toasted French bread or pita chips.

Explore more Garden Chef recipes here.

Vanilla Cocktails and the Science Cafe

It's hard to believe, but the end of the 2011 Science Cafe series is almost here. Thursday, October 20 is the sixth and final event for the season, and we are thrilled to have Matt Richards, Atlanta Botanical Garden Conservation Coordinator, as our guest speaker. His discussion will focus on native orchids and conservation, and the event will take place in the Fuqua Orchid Center during Fest-of-Ale. Guests are invited to sample our evolutionary cocktail, which features flavoring from the vanilla orchid, and enjoy a pre-Cafe discussion.

The Orchid Display House has grown so vast that it includes species from Madagascar, Ecuador, Australia, Central America, Mexico, and Asia. You may pick up the scent of vanilla, because this comes from the seed capsule of several species of orchids of the genus Vanilla. In fact, you can find a different species of Vanilla at the base of each cedar post in the display house.

Come to this month's Science Cafe, and see how many scents and tastes you can spot in the vanilla orchid cocktail. Stick around for Matt’s discussion, and learn about the evolution of these intoxicating orchid flowers.

With the support of the Atlanta Science Tavern, the Science Cafe series is sponsored by the Center for Chemical Evolution. Science Cafe is held every third Thursday between May and October. Admission to the Garden is free for members and $18.95 for non-members and includes access to Fest-of-Ale. Evolutionary cocktails are $7, wine is $6, and beer is $5. For more information, visit www.atlantabotanicalgarden.org/events.

Friday, October 7, 2011

Preserving and Pickling

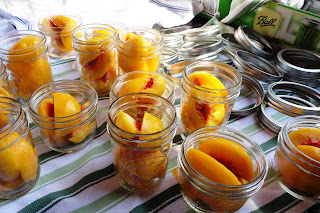
We were honored to have Steven Satterfield, Chef and Owner of Miller Union, here to teach a class on preserving and pickling on Saturday, August 13. Here’s a series of snapshots from the afternoon in the Edible Garden Outdoor Kitchen.

Keep an eye on the list of classes at the Atlanta Botanical Garden for more preserving sessions in 2012.

Wednesday, October 5, 2011

Roasted Tomatillo Salsa

Tomatillos are a staple of Latin American cuisine and are often used in green sauces. Even though tomatillos are sometimes called "green tomatoes," they should not be confused with green, unripe tomatoes. Tomatoes are in the same family as tomatillos, but a different genus. Tomatillos are a great fruit to grow at home because ripe tomatillos will keep in the refrigerator for about two weeks. They will keep even longer if the husks are removed first.

When growing tomatillos, it is important to keep in mind that they are self-incompatible, which means you need to have two plants that are genetically different enough to create fruit and viable seed. In other words, if you had just one tomatillo plant you would not get fruit. If you only have one tomatillo planted in your yard and you still get fruit, there must be another plant planted closely enough, for pollinators to carry the pollen of one plant to the other.

For her salsa recipe, Garden Chef Megan McCarthy threw some 'Purple Coban' tomatillos on the grill and roasted the rest in a cast iron pan.

Making your own salsa at home is quick and easy, as long as you have a food processor and a few key, fresh ingredients. It’s good for you too, as many commercial salsas contain preservatives and other undesirables.

Roasted Tomatillo Salsa

1 lb tomatillos, husked
1 Red Fresno chile pepper
2-3 cloves garlic, peeled
½ sweet onion, peeled and quartered
¼ cup cilantro, chopped
juice of ½ fresh lime
salt and pepper to taste

Place the tomatillos, whole chile, garlic cloves, and onion in a dry, cast iron pan. Roast on medium heat, turning occasionally, for about 15 minutes or until all ingredients have charred a bit and tomatillos have softened. Remove from pan and allow to slightly cool. Remove seeds from chile pepper. Place ingredients in food processor and pulse. Add in cilantro, lime juice, salt and pepper to taste. Salsa can be warmed in saucepan over medium heat for about 5 minutes if mellower flavor is desired. Serve with favorite tortilla chips or as a sauce over chicken and fish.

Alternative roasting methods: Place whole tomatillos under the broiler on a baking sheet and roast for about 8 minutes, turning a few times. Grilling is also a great way to roast tomatillos.

Find more Garden Chef recipes here.